I tried my very best to fill up the whole tree on my wall with sakuras. However, I only managed to make a few. I think I need more than a month to complete my wall since there are lotsa other commitments at the moment. Gonna update with more photos once I finish it up. <3
Saturday, April 23, 2011
Tuesday, April 19, 2011
Origami : Sakura
In love with this sakura origami by Yuichi at first sight. I always wanted to make something like this but never really have time or chance to do so. However, the instructions provided are very easy and simple to follow.

Here are my first attempt to fold some sakuras. The outcomes were not bad. Gonna make more so that i can have a whole branch full with sakura. can't wait~

Monday, March 28, 2011
Origami : Swallowtail Butterfly
Learned to fold this swallowtail butterfly origami from this website. The instructions was clear and easy to follow. I used some japanese patterned origami papers because I like the pattern very much. I pasted the butterflies on my wall to embellish my tree deco. I am loving it very much and now, I just can't stop staring at my wall. <3

my 1st attempt
the butterfly really matches my wall
Saturday, March 12, 2011
Felt Craft: Red Ixora Brooch
I always love flowers. Being brought up by parents who love gardening, has given me chances to know different types of beautiful flowers. I have seen many species of orchids, roses, bougainvilleas and many more other flowers as the results of frequent visits to plants nursery with my mom. But I always attracted to flowers that are small, have vibrant colours and bloom like pom-poms. And since I can't wear a fresh one as brooch to school, I decided to make a felt one. This time, I'm inspired by Ixora.

Fresh Ixora

Felt Ixora brooch (Front)

Felt Ixora brooch (Back)
After I'd done stitching the pinback, I just realised that Ixora only has 4 petals instead of 5 like my brooch. My mistake.. Really need to do some homeworks before cutting felt next time.
Feel like making a Hydrangea brooch in future. Who doesn't love Hydrangea especially the purplish pink one, right?

Hydrangea
Sunday, February 20, 2011
Felt Craft: Grey Flower Brooch
My trip to Daiso never end with nothing in my hand. This time, I bought a cute grey felt that just reminds my of my rabbit, Moko and made a flower brooch from it.

Moko is the plump grey bunny on the left, which was happily eating the greens when I took this picture.

This is the brooch I made from the felt. I really like the colour which is not too dark nor too light. Gonna wear it to school this week!
Sunday, January 2, 2011
Felt Craft: Mini Bunny
I came across a very inspirational blog by Betz White. I have to admit that she is one of the greatest crafter alive! She is very creative and all her projects are so cute and adorable. One of her project is the cashmere bunny tutorial. The steps in the tutorial are very helpful and template is also provided. Plus, the bunnies are so cute that really make you wanted to sew one for yourself.

I tried to make one for myself but differ in size. I made mine smaller which was about 2 inches long because I wanted to use it as handphone charm. Obviously, my bunny was messier and less cuter compared to hers. Haha..
Thursday, December 30, 2010
Crochet Crazee : My 1st Granny Square
I'm proudly presenting....

My 1st granny square. It is messy because I'm still terrible in crochet. With lots more of practice, my granny square will improve and I maybe can make a blanket or pillow cover one day. Definitely will update you if I were successfully in making one. Huhu. Actually, I wanted to crochet granny square but never came across the simple instruction. Luckily, yvestown is kind enough to post the how-to in her blog. Thanks yvestown!!!
Wednesday, December 29, 2010
Felt Craft: Owlie Keychain
Yup. Another post about owl keychains. I know that I'm just crazy about owl. My sister always asks me why I love to make craft that used owl pattern. Who doesn't adore the owl's cute big eyes and small beak? Or it is just me? Hurmm.... The owl keychain I made last time was different in pattern and size. This time, I made these owl keychains using upcycled cotton fabrics ( scraps from altered pyjamas). It was fun to made the colourful keychains because I can mix and match to find the yummy colour combination. Enjoy~


Saturday, December 25, 2010
Friday, December 24, 2010
Another Fabric Flower Brooch

Making fabric flower brooch is just too addictive! I make another brooch for myself again using the tutorial by Melissa.
Sunday, December 19, 2010
DIY : Cactus Terrarium

I always love cactus since I was a child. But my cactus never live for more than 2 months and always ends up get rotten. After I looked up in Google, I finally know the reason why my cactus always die. It is because I water them every day. I was afraid that my cactus didn't get enough water. The truth is cactus need to be watered only once every month or water only when the soil is dry (check the humidity of your soil using your finger, if the soil stick, don't water the cactus yet). So, after have enough knowledge about cactus, I decided to plant a cactus terrarium. The cactus terrarium needs about 1 hour and the materials needed are inexpensive. Besides, don't worry if you are bad at gardening because this terrarium requires minimum maintenance. It is very easy peasy and you can try this at home.
Things needed:

- different types of cactus and succulents
- container with wide opening
- gravel (for drainage)
- sand
- soil
- small rocks (for decoration)
Instructions:
1. Lays about 1-inch layer of gravel at the bottom of the container. Gravel provides drainage for your terrarium as cactus only need little water.
2. Mix the sand with soil. The proportion is 1:1 (1 part of sand and 1 part of soil)
3. Put in the mix soil in the container. The layer of the mix soil should be about 2 - 3 inch.
4. Make holes using your fingers and place the plants into the soil. You can arrange your plants anyway you like.

1. Lays about 1-inch layer of gravel at the bottom of the container. Gravel provides drainage for your terrarium as cactus only need little water.
2. Mix the sand with soil. The proportion is 1:1 (1 part of sand and 1 part of soil)
3. Put in the mix soil in the container. The layer of the mix soil should be about 2 - 3 inch.
4. Make holes using your fingers and place the plants into the soil. You can arrange your plants anyway you like. 
5. Then, place the small rocks on the top layer. You can also add any garden ornaments such as large rocks. This is what your terrarium should look like from side view.
Reminder:
1. Remember to poke the soil using a small stick every 2 days to provide ventilation to the soil.
2. Provide your cactus at least 5 - 6 hours of direct sunlight daily. If it is placed indoor, place it beside the window.
3. Water only once every month or only when the soil is dry. Do not overwater your cactus.
Resource: Martha Stewart's Website
Wednesday, December 15, 2010
Weekend Project: Fabric Flower brooch
During the weekend, I made these brooches after been inspired with great tutorials (pointed petals) by Melissa and (rounded petals) by Khris. They are very kind to post some tutorials on how to make a fabric flower. I used cotton fabric scraps because cotton is much easier to sew with and also it shapes as you desired. Feel free to follow the links provided at the bottom of this post for different types of fabric flowers. Happy trying!


learned to make the felt button (middle of the flower) from this tutorial

sew a safety pin at the back to make it as a brooch

made a smaller version to wear at work

this flower uses different technique from Melissa's (tutorial)
Flower Tutorials:
Sunday, December 5, 2010
Felt Craft: Doll Keychain - Addicted!!!
Just finished another batch of dolls. I'm really had fun in designing their dresses. The dresses were made of unused ribbons. Some designs were suggested by my sisters. They love red and black so much. The first 2 dolls were their ideas..


Thursday, November 25, 2010
Felt Craft: Senorita Doll Keychain
I'm really addicted in making this felt doll. This time : long hair + red roses + polka dot + lace = cute senorita!!
Felt Craft: Another Batch of Felt Brooch
These are another brooches ordered by Aziah. There are still a few more to made for her. Ganbate!!

Saturday, November 20, 2010
Crochet Crazee: Dangling Handphone Charm?
Actually, I finished making these crocheted dangling handphone charms more than 2 weeks ago but kept forgotten to post about it. Each charm is consisted of 5 cute crochet rings and a Tibetan silver leaf charm. I made these for my sister's friend and she wanted her charms to be colourful. But, because I was addicted in making those cute rings, I made more than she ordered. Hehe... Making craft is just so contagious right? Enjoy~
Felt Craft: Doll Keychain
Flickr is absolutely a place where you can find many creative ideas related to felt craft. Thanks to those creative crafters, I had the chance to steal (muahaha!!!) their ideas and managed to make this doll keychain. I used the cute buttons given by Aziah to embellish the doll. This doll can be made into keychain, brooch or even pendant. Gonna make one for Aziah as the thank you gift~Aziah reminds me of half covered face with side-swept bangs and lotsa RED n BLACK!!!
Friday, November 19, 2010
Felt Craft: Hootie Hoot!!
Remember the buttons that I bought last time? I used it as the eyes for my owl keychain. It came out pretty good. Love the buttons very much...
Thursday, November 18, 2010
DIY : Paper Bunting
When I was posted to my new school, I was assigned with several tasks. One of them is the class teacher of 4 Tekun. As the school term is almost end, the pupils wanted to have a class party. So, I decided to do some decorations for the party. I tried to make some pom poms but they are too time consuming. Then, I opted to make bunting as it is easier and time saving. Plus, it was fun doing it with the helps from your pupils (although it took double of your time than you do it alone).
Things needed:
- string
- scissor
- glue
Instructions:
1. Cut the coloured papers into triangle. Don't forget to leave some tab on the top of your triangle (It is for putting the string through)
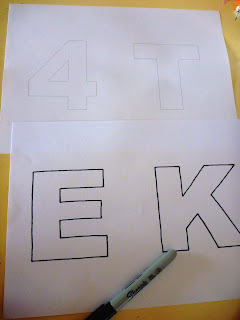
2. Print out the wordings according to your desired size and type of font. (I outlined my letters with sharpie so that the line will be thicker and easier to read from far)
3. Front : Then, cut out all the letters and paste it on the triangles.
4. Back : Fold the tab (on the top of triangle) and put some cellophane tape or masking tape. Put the string through your triangle.
P/S: I forgot to snap pic for this step because I was too busy instructing the pupils.
5. Finally, put up your bunting and dont forget to use lotsa and lotsa of tape or your bunting will be ended up like mine. Droopy and kept on falling off.
The pupils wanted to take some pics with the bunting that they made. You can see that it kept on falling off.
Wednesday, November 17, 2010
Felt Craft: Present for my students
Eventhough I'm really busy lately, I still manage to spend a moment to make my students who got 5As for the final exam present. They always complimented my (cute?)brooches and showed interest. So, I wanted to make something cute and memorable for them. These keychains are really suitable for 10 years old kids. The most important thing is they love it very much!!!
Subscribe to:
Posts (Atom)